yoshi blog

IT infra engineer working at Tokyo, Japan. coding on weekends just for fun.

Sunday, May 28, 2017

play with python turtle

drawing by python is fun! You can start drawing with python script by importing "turtle module".

1. sample code

# coding: utf-8

import turtle
t = turtle.Pen()
while True:
    color_list = 'pink', 'green', 'purple'
    import random
    scale = random.randint(50, 100)
    print("scale %s" % scale)
    t.left(60)
    for c in color_list:
        i = 1
        print("color %s" % c)
        while i <= 360 / 60:
            print("count %s" % i)
            t.begin_fill()
            t.forward(scale)
            t.fillcolor(c)
            t.left(30)
            t.circle(scale/4, 180)
            t.right(180)
            t.circle(scale/4, 180)
            t.left(30)
            t.forward(scale)
            t.left(180)
            i = i + 1
            t.end_fill()
        scale = scale * 0.8
    t.up()
    location = random.randint(100, 300)
    print("location %s" % location)
    t.left(scale)
    t.forward(location)
    t.left(scale)
    t.forward(location)
    t.down()
turtle.done()

2. execution

% python turtle_work.py
Posted by yoshi at 2:45 AM
Labels: python

check /etc/hosts by shell script

To practice shell script coding, I coded host check script which ping to hosts wrote in /etc/hosts file and generate check result logs.

1. script

#!/bin/bash

# make directory if unexist
DIR=./pinglog

if [ ! -d $DIR ]; then
mkdir $DIR
echo -e "directory created"
fi

# variables
LOGDIR=$DIR
NOW=$(date +"%Y%m%d-%H%M%S")

OKLOG=$LOGDIR/hostcheck_$NOW.log
NGLOG=$LOGDIR/hostcheck_error_$NOW.log

# check ping reply
while read line; do
hosts=$(echo $line | grep -v ^# | grep -v ^$ | grep -v localhost | cut -d " " -f 2)

# ping to hosts
if [ -n "$hosts" ]; then
ping -c 1 $hosts > /dev/null 2>&1

# it got reply "hostname : OK" else "hostname : NG"
# output OK-log and NG-log file

if [ $? -eq 0 ]; then
echo -e "$hosts : OK" >> $OKLOG
else
echo -e "$hosts : NG" >> $NGLOG
fi
fi
done < /etc/hosts

echo -e "done"
github link is below https://github.com/yoshi-island/shell-script_work/blob/master/check_hosts.sh

2. prepare

In this case, I made active hosts by vagrant on virtualbox. vagrantfile is wrote like this.
VAGRANTFILE_API_VERSION = "2"

Vagrant.configure(VAGRANTFILE_API_VERSION) do |config|

  config.vm.define :server do |server|
    server.vm.box = "centos7.0_x64"
    server.vm.hostname = "server"
    server.vm.network :private_network, ip: "192.168.111.223"
    #server.ssh.private_key_path = "~/.ssh/id_rsa"
  end

  config.vm.define :client do |client|
    client.vm.box = "centos7.0_x64"
    client.vm.hostname = "client"
    client.vm.network :private_network, ip: "192.168.111.224"
    #client.ssh.private_key_path = "~/.ssh/id_rsa"
  end

end
start machines on.
% vagrant up

/etc/hosts file is wrote like this.
% cat /etc/hosts | egrep -v "^#"
127.0.0.1    localhost
::1             localhost
192.168.111.223 server  # active on virtualbox
192.168.111.224 client  # active on virtualbox
111.111.111.111 dummy  # dummyhost

3. execute

execute
% bash check_hosts.sh
directory created
done
results
% cat pinglog/hostcheck_20170527-232436.log
server : OK
client : OK
% cat pinglog/hostcheck_error_20170527-232436.log
dummy : NG
Posted by yoshi at 2:44 AM
Labels: shellscript

hit and blow game coded by python

coding "hit and blow game" is a best way to get start studying new program language. I coded by python with my friends.

1. rules

- find out correct 3 digits.
- each digits used only at once, not like "555", "323"
- if digit "correct" and place "incorrect", counted as "blow".
- if digit "correct" and place "correct", counted as "hit".
% python hitandblow.py
Enter three digits >>123
0 hit 0 blow
Enter three digits >>456
0 hit 1 blow
Enter three digits >>857
1 hit 2 blow
Enter three digits >>875
3 hit 0 blow
congratulation!

2. code sample

import random
 
def judge(c, u):
h=0
b=0
 
for x in range(3):
for y in range(3):
if c[x] == u[y]:
if x == y:
h = h + 1
else:
b = b + 1
 
print("%s hit %s blow" %(h,b))
 
if h == 3:
print("congratulation!")
return True
else:
return False
 
if __name__ == '__main__':
 
com = []
while len(com)!=3:
rannum = random.randint(0,9)
if rannum not in com:
com.append(rannum)
 
while True:
usrnum=input("Enter three digits >>")
usr = (int(usrnum[0]),int(usrnum[1]),int(usrnum[2]))
 
if judge(com,usr) == True:
break
Posted by yoshi at 2:43 AM
Labels: python

how to treat "<" ">" "&" on blogger post?

1. to write "<" ">" "&"

when you want to write "<" ">" "&" on blogger post html editor. Use FREEFORMATTER.COM. get code and paste on your html.
< > &

2. to write "&lt; &gt; &amp;"

To write "&lt; &gt; &amp;", write like this.
&amp;lt; &amp;gt; &amp;amp;
How easy!
Posted by yoshi at 2:43 AM
Labels: blogger

highlight code on blogger with code-pretty

Mainly, there are two ways to highlight codes on blogger which are syntaxhighlighter and code-prettify. I tried code-prettify and installation tips are below.

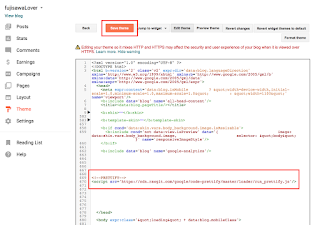
1. config template

open the http configuration page("theme" > "edit html")


put the script tag below just above "<head>".
<script src="https://cdn.rawgit.com/google/code-prettify/master/loader/run_prettify.js"></script>

then push the save button.

2. write blog post

To write blog post, write like this. make sure you select "html" tab to edit post.
<pre class="prettyprint"><code class="language-python">
# code here
print ("hogehoge")
</code></pre>
shown like this.
# code here
print ("hogehoge")
Posted by yoshi at 2:42 AM
Labels: blogger

hello golang

how to start golang on mac os.

1. install golang

% brew install go

2. coding

% cat go_work.go
package main
import "fmt"

func main() {
SayHello()
}

func SayHello() {
fmt.Println("Hello World for go lang")
}

3. execution

run without build
% go run go_work.go
Hello World for go lang
build and run
% go build go_work.go
% ./go_work
Hello World for go lang
Posted by yoshi at 2:30 AM
Labels: go

make sound with javascript

javascript can make sound. I tried as a first javascript coding. the sound is from the famous Japanese movie :)

push the button to play music. *check the system volume!!
Audio API test

sample code is below.
<!DOCTYPE html>
<html lang="ja">
     <head>
          <meta charset="utf-8">
          <meta http-equiv="X-UA-Compatible" content="IE=edge">
     <meta name="viewport" content="width=device-width, initial-scale=1, user-scalable=no">

          <title>Audio API test</title>

          <!-- Bootstrap core CSS -->
          <link href="https://maxcdn.bootstrapcdn.com/bootstrap/3.3.6/css/bootstrap.min.css" rel="stylesheet" id="themesid">

          <!-- Custom styles -->
          <link href="https://getbootstrap.com/examples/theme/theme.css" rel="stylesheet">
          <link href="https://getbootstrap.com/dist/css/bootstrap-theme.min.css" rel="stylesheet">
          <link href="https://getbootstrap.com/examples/offcanvas/offcanvas.css" rel="stylesheet">

     </head>

     <body>
          <div class="container">
               <div class="row row-offcanvas row-offcanvas-right">
                    <div class="col-xs-12 col-sm-9">
                         <div class="row">

                              <!-- button -->
                              <div class="container theme-showcase" role="main">
                                   <p>
                                        <button type="button" class="btn btn-lg btn-primary" id="PlayButton">Play</button>
                                   </p>
                              </div>

                         </div>
                    </div>
               </div>
          </div>

          <script>
               function play() {

                    window.AudioContext = window.AudioContext || window.webkitAudioContext; // cross browser
                    var audioCtx = new AudioContext();

          for (key = 0; key < music.length; key++) {

                         // define sound key
                         if(music[key] == "Do"){var hz = 262;}
                         if(music[key] == "re"){var hz = 294;}
                         if(music[key] == "mi"){var hz = 330;}
                         if(music[key] == "fa"){var hz = 349;}
                         if(music[key] == "so"){var hz = 392;}
                         if(music[key] == "la"){var hz = 440;}
                         if(music[key] == "si"){var hz = 494;}
                         if(music[key] == "Doo"){var hz = 523;}
                         if(music[key] == "ree"){var hz = 587;}
                         if(music[key] == "mii"){var hz = 659;}
                         if(music[key] == "faa"){var hz = 699;}
                         if(music[key] == "soo"){var hz = 784;}
                         if(music[key] == "laa"){var hz = 880;}
                         if(music[key] == "sii"){var hz = 988;}

                         // sound play
                         if(hz != "none"){
                              var osciillator = audioCtx.createOscillator();   // sound generate
                              osciillator.frequency.value = hz;   // defined hertz 
                         var audioDestination = audioCtx.destination;   //defined sound output
                         osciillator.connect(audioDestination);   // connect speaker
                         osciillator.start = osciillator.start || osciillator.noteOn; // cross browser
                         osciillator.start();  // start playing
                              osciillator.stop(audioCtx.currentTime + time[key]);   // stop sound after time[key] sec
                         }

                         // sleep between each sound
                         Sleep(time[key]+0.1);

                    }
               }

               // sleep function
               function Sleep(T){
                  var d1 = new Date().getTime();
                  var d2 = new Date().getTime();
                  while( d2 < d1+1000*T ){     // wait T sec
                       d2=new Date().getTime();
                  }
                  return;
               }

               // defined tone
               var music = [];
               music.push("soo");
               music.push("mii");
               music.push("Doo");
               music.push("so");
               music.push("so");
               music.push("so");
               music.push("la");
               music.push("Doo");
               music.push("faa");
               music.push("laa");
               music.push("soo");

               // defined length of sound
               var time = [];
               time.push(0.7);
               time.push(0.2);
               time.push(0.7);
               time.push(0.2);
               time.push(0.2);
               time.push(0.2);
               time.push(0.2);
               time.push(0.2);
               time.push(0.2);
               time.push(0.2);
               time.push(0.7);

               // execution
               var Button1 = document.getElementsByClassName("btn btn-lg btn-primary");
               Button1[0].addEventListener("click", play, false);

          </script>
     </body>
</html>
Posted by yoshi at 2:15 AM
Labels: html, javascript

differences between "pyenv", "pyenv-virtualenv" and "virtualenv"

differences between "pyenv", "pyenv-virtualenv" and "virtualenv" are very confusing. clearly defined the definition on this article.

1. pyenv

"pyenv" globally manage python versions. each versions has one environment.
% pyenv versions
  system
  2.7.5
  2.7.6
  2.7.8
* 3.5.0

2. virtualenv

"pyenv-virtualenv" is external function of pyenv. multiple environments can exist on same versions.
~/virtualenv1 % bash bin/activate  # activate peen-virtualenv
(virtualenv1) ~/virtualenv1 % pyenv versions
  system
  2.7.5
  2.7.6
  2.7.8
* 3.5.0 (set by xxx/.python-version)
(virtualenv1) ~/virtualenv1 % deactivate  # deactivate peen-virtualenv
~/virtualenv1 %

3. pyenv-virtualenv

"virtualenv" apply python versions to each directories. virtualenv automatically change environment when user move on the directories.
~/pyenv_test $ cd pyenv-virtualenv1/
(pyenv-virtualenv1) ~/pyenv_test/pyenv-virtualenv1 $

(pyenv-virtualenv1) ~/pyenv_test/pyenv-virtualenv1 $ cat .python-version
pyenv-virtualenv1
Posted by yoshi at 2:00 AM
Labels: python

generate random odd/even number with ansible

ansible random module can control start, end and steps when generate random number.

1. make odd and even random number

code here.
% cat random_test.yml
- hosts: all
  become: true
  user: vagrant
  tasks:
  - set_fact:
      var1: "{{ 100 |random(1,2) }}" # odd random number 1-100 
      var2: "{{ 100 |random(2,2) }}" # even random number 2-100
  - debug:
      msg:
        - "odd number is {{ var1 }}"
        - "even number is {{ var2 }}"
generate numbers successfully.
% ansible-playbook -i hosts random_test.yml

PLAY [all] *********************************************************************

TASK [setup] *******************************************************************
ok: [192.168.111.223]
ok: [192.168.111.224]

TASK [set_fact] ****************************************************************
ok: [192.168.111.224]
ok: [192.168.111.223]

TASK [debug] *******************************************************************
ok: [192.168.111.224] => {
    "msg": [
        "odd number is 33",
        "even number is 80"
    ]
}
ok: [192.168.111.223] => {
    "msg": [
        "odd number is 1",
        "even number is 72"
    ]
}

PLAY RECAP *********************************************************************
192.168.111.223            : ok=3    changed=0    unreachable=0    failed=0
192.168.111.224            : ok=3    changed=0    unreachable=0    failed=0
Posted by yoshi at 1:35 AM
Labels: ansible

how to start ansible?

Ansible is a tool to automatically build and configure virtual machines. There are many ways to build directory tree to execute ansible codes. Today I will show you the easiest way to get start ansible. *on mac os environment

1. install ansible

please check your computer has python. ansible works on python.
% python
...
>>>

if you have not install yet, get it.
*the command below is for mac os.
% brew install python
Then, get ansible.
% pip install ansible

2. prepare directory and files

create the files below under the same directory.
% ls
ansible.cfg  # configuration file
hosts  # hosts file
hello_ansible.yml  # execution file

include define hosts file path and ssh key file path on ansible.cfg file.
% cat ansible.cfg
[defaults]
hostfile = ./hosts
private_key_file=$HOME/.ssh/id_rsa
include target hosts address, username and passwords on ansible.cfg file. I have two hosts "192.168.111.223" and "192.168.111.224".
% cat hosts
[all]
192.168.111.223
192.168.111.224

[server]
192.168.111.223

[client]
192.168.111.224

[all:vars]
ansible_ssh_user=vagrant
ansible_ssh_pass=vagrant
ansible script file is here.
% cat hello_ansible.yml
- hosts: all
  become: true
  user: vagrant
  tasks:
  - debug:
      msg:
        - "hello ansible"

3. execution

% ansible-playbook -i hosts hello_ansible.yml

PLAY [all] *********************************************************************

TASK [setup] *******************************************************************
ok: [192.168.111.223]
ok: [192.168.111.224]

TASK [debug] *******************************************************************
ok: [192.168.111.224] => {
    "msg": [
        "hello ansible"
    ]
}
ok: [192.168.111.223] => {
    "msg": [
        "hello ansible"
    ]
}

PLAY RECAP *********************************************************************
192.168.111.223            : ok=2    changed=0    unreachable=0    failed=0
192.168.111.224            : ok=2    changed=0    unreachable=0    failed=0
Posted by yoshi at 1:21 AM
Labels: ansible, python

auto ssh login shell script

automatically ssh login script below.

1. directory tree

% tree
.
├── auto_login.sh # main file
├── login_client.sh # script to login client host
└── login_server.sh # script to login server host
% cat auto_login.sh
#!/bin/sh

 auto_ssh() {
     host=$1
     id=$2
     pass=$3

      expect -c "
      set timeout 10
      spawn ssh ${id}@${host}
      #expect \"Are you sure you want to continue connecting (yes/no)?\"
      #send \"yes\n\"
      expect \"${id}@${host}'s password:\"
      send \"$pass\n\"
      expect \"# \"
      send \"cd /opt/work/ ; ls\n\"
      interact
      "
 }
remove "#" if you have not exchange ssh key with target host yet.
% cat login_server.sh
#!/bin/sh

# execute main script
. ./auto_login.sh
# auto login 'host address' 'username' 'password'
auto_ssh '192.168.111.223' 'vagrant' 'vagrant'
% cat login_client.sh
#!/bin/sh

# execute main script
. ./auto_login.sh
# auto login 'host address' 'username' 'password'
auto_ssh '192.168.111.224' 'vagrant' 'vagrant'

2. execution

% bash login_server.sh
spawn ssh vagrant@192.168.111.223
vagrant@192.168.111.223's password:
Last login: Sat May 27 17:19:45 2017 from 192.168.111.1
Welcome to your Vagrant-built virtual machine.
[vagrant@server ~]$
Posted by yoshi at 12:32 AM
Labels: shellscript
Newer Posts Home
Subscribe to: Posts (Atom)

About Me

IT infra engineer working at Tokyo. want to improve english skill.

Labels

python mac ansible aws blogger html javascript shellscript apache bitnami go linux nginx ssl ubuntu vagrant virtualbox vmware

Line stamp

Line stamp
Line stamp I made is here. I hope you like them!

tip me for more fun!

15zgMbiE1aSwGvWxTzTjtoiLN5FrRwqpKv Donate with IndieSquare

links

  • github
  • line
  • blog(Japanese)

twitter

Tweets by yoshiisland_dev

Search This Blog

Labels

  • ansible (2)
  • apache (1)
  • aws (2)
  • bitnami (1)
  • blogger (2)
  • go (1)
  • html (2)
  • javascript (2)
  • linux (1)
  • mac (3)
  • nginx (1)
  • python (5)
  • shellscript (2)
  • ssl (1)
  • ubuntu (1)
  • vagrant (1)
  • virtualbox (1)
  • vmware (1)

Blog Archive

  • ►  2019 (1)
    • ►  December (1)
  • ►  2018 (2)
    • ►  April (1)
    • ►  January (1)
  • ▼  2017 (14)
    • ►  December (1)
    • ►  July (1)
    • ►  June (1)
    • ▼  May (11)
      • play with python turtle
      • check /etc/hosts by shell script
      • hit and blow game coded by python
      • how to treat "<" ">" "&" on blogger post?
      • highlight code on blogger with code-pretty
      • hello golang
      • make sound with javascript
      • differences between "pyenv", "pyenv-virtualenv" an...
      • generate random odd/even number with ansible
      • how to start ansible?
      • auto ssh login shell script

Pages

  • Home
Simple theme. Powered by Blogger.